


When you are shipping a package, it becomes important to know how to fill out a shipping label. A shipping label has all the information that the courier needs to get your package to its destination safely and on time.
Whether you just need to ship something, have an online shop, or need to send an item back, this article will explain to you how to properly fill out a shipping label. Using the tools on Shipixy, it is possible to make shipping labels and print them within seconds, with accuracy and speed.
What Is a Shipping Label?
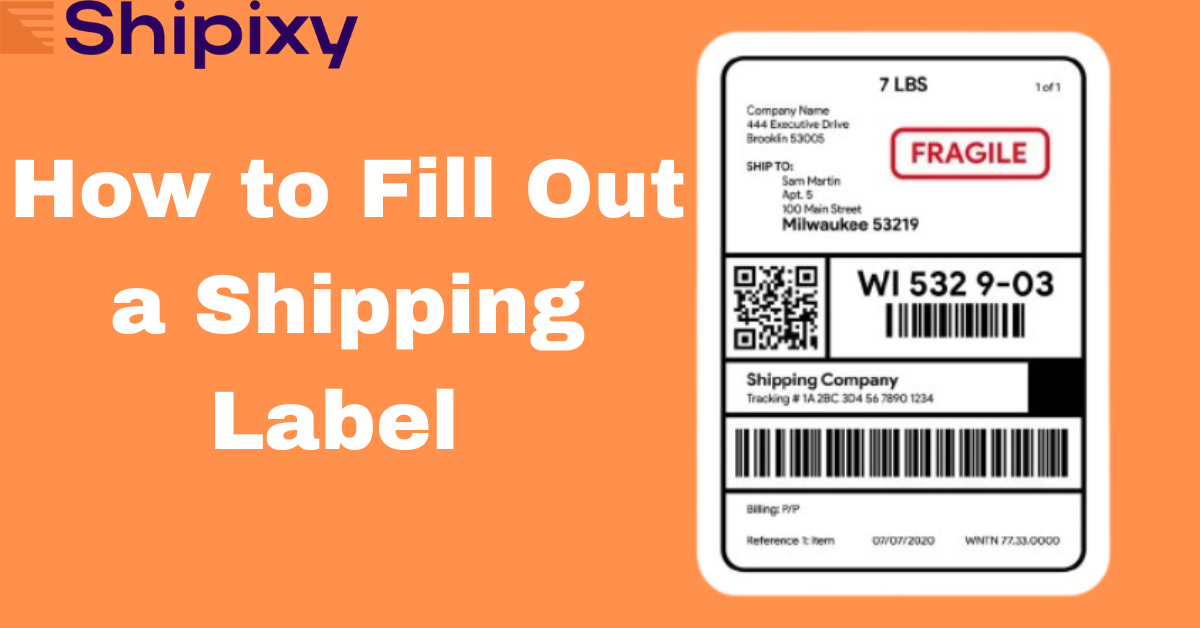
A shipping print is the part of the paper or sticker that you will find in your package and which indicates the key details of a delivery. It typically consists of:
- Addresses of sender and receiver
- Weight and size of a package
- Delivery mode (e.g., standard, express)
- Tracking number
- A scannable bar code that is available during the shipment process
These labels are necessary to indicate the destination of the package, the service being used, and the sender and recipient of the package. If a label is not attached correctly, your parcel may be delayed, lost, or sent back.
Shipixy enables the professional, scannable shipping label to be generated in less than 30 seconds. All you need to do is provide your order details, and our system will handle the rest.
How to Fill in a Shipping Label
To complete a shipping label, you need to type or enter the complete address and name of the sender and recipient of a package, provide its weight and dimensions, choose the shipping option, and print the label with the visible tracking barcode or securely affix it.
So, let’s have a look at the step-by-step process of how to create and complete a shipping label.
Step 1: Collect All the Necessary Information
Before being able to fill out the label, ensure that you have:
- Return address and the name of the Sender
- Full name of the recipient and the address of delivery
- Package size and weight
- Preferred shipping service (such as standard, 2-day, or overnight)
With our dashboard, you only have to enter your shipping information once, and then it will be automatically used on all new labels.
Step 2: Choose How to Create the Label
Depending on the tools you have, you can either design the label online or by hand:
Online: You can ship with ease by generating shipping labels in no time and in a secure manner with the help of online tools. It only requires you to enter your shipping details, decide on your carrier, and print the label.
Write-in Labels: You can handwrite the label on a sheet of paper with clear block letters with the use of permanent ink if you do not have a printer. Ensure that it is readable.
Step 3: Put the Necessary Information on the Label
On your label, you must have:
- Sender Information: With full name and address of return
- Receiver Information: With full name and delivery address, and phone number (optional)
- Shipping Class: e.g., standard, express, or overnight
- Tracking Number and Barcode: Automatically created at the time of the label creation
No more manual barcode and tracking numbers required when you print your shipping label through our platform. We auto-generate, and all you need to do is simply print and stick!
Step 4: Print and Stick the Label in the Package
When you have a label ready:
- Print it with a regular or thermal printer
- Stick to the widest and closest flat space on the package
- Never cover the barcode with any tape or stick the label on the corners
We allow you to select the PDF or thermal printer format, which is convenient for printing.
Step 5: Recheck Everything
Prior to delivery of the package:
- Check the names, addresses, and ZIP/postal code once again
- Make sure the tracking number is there and is accurate
- Ensure that the barcode is clean and can be scanned
Step 6: Add Customs Information to International Shipments
In case of international shipments, you would fill out an international customs declaration form that contains:
- Listing of the contents in the package
- The volume and the worth of the items
- Quantity and cost of the goods
- It can be a gift, a sale, or personal use
At our platform, there are in-built customs forms tools to ship cross-border without requiring additional forms.
Step 7: Return Label Creation (Optional)
When you have an option of returns, or when sending an item that can be returned:
- Prepare a prepaid return label that is printable and placed inside the box or sent as an email to the recipient
- Our Return Label Generator ensures the returns are easy for your customers and keeps your process professional.
USA Standard Way to Fill Out a Shipping Label
This is an example of how to fill out a USA shipping label.
Based on (Sender Information)
John Smith
456 Oakwood Lane
Dallas, TX 75201
United States
Phone: +1 (214) 555-7890
To (Recipient Information)
Emily Johnson
123 Maple Street
San Francisco, CA 94103
United States
Ph: +1 (415) 555-1234
The Details of Shipping Service
USPS Priority Mail carrier
Weight of a Package: 3 lbs
Size: 12x9x6 inches
Shipping Date: 29/7/2025
Tracking & Reference
Tracking Number: 9405503699300215123456
Reference number: US45875
Customs Info (International only)
It is not necessary for domestic shipments in the USA..
Additional Materials (Optional)
Label Indicator: Prepaid
Barcode area: It is produced automatically when one purchases a label online
Invoice/Reference Number: To track the business or customer orders
Most of the time, this is what a real USA shipping label looks like. As you provide your order and carrier information to Shipixy, most fields are already filled up.
Conclusion
A shipping label is easy to fill up, but one should not make a mistake. Even one error is going to cause delays or lost packages. With these 7 steps, you will make sure your parcel reaches the right place on time.
Fill out your shipping label with the help of the Shipixy tool and stop making shipping mistakes like running out of labels or paperwork, wasting time, and avoiding backorders.
FAQs
1. Is it possible to create a shipping label by hand?
You can do it. Simply make use of block letters and ensure that everything is made clear and permanent. Yet it is easier to print using our tools. Labels are usually printed so that they are easily understood and traced.
2. Where should I put the shipping label on a box?
Stick it on the top or the greatest flat surface of the package. Be careful that you do not put it on the edge.
3. Should I have a printer to be able to ship a package?
Not always. You may write it on your hand or get it delivered using our platform and email a label to a local print store or a customer. Some carriers provide QR codes to be printed in-store.
4. Does it always have a tracking number?
When you generate a label online using tools, most shipping providers will give you a tracking number. Never lose the tracking number until you have received the package.
5. What should I do in case of an error on the label?
The package can be delayed, misrouted, and returned. Our team can verify your data twice to avoid mistakes before completing a label. In case you find an error prior to shipping, it is preferable to reprint the label.


